Outgoing Mail Settings
Access from the Admin Console
Location: Site > Notifications > Outgoing Mail Settings
Overview
You can configure AnswerHub’s outgoing email system to notify users of new activity in their community on their AnswerHub site.
PLEASE NOTE:
The outgoing email should not be your personal email. You should have your IT department create a dedicated email address for you to use as your outgoing email address for your AnswerHub Community. The system sends all emails from your own email server, please do not leave any of the answerhub.com email addresses or servers in the fields.
To Edit Your Outgoing Mail Settings, You Can Perform the Following Actions:
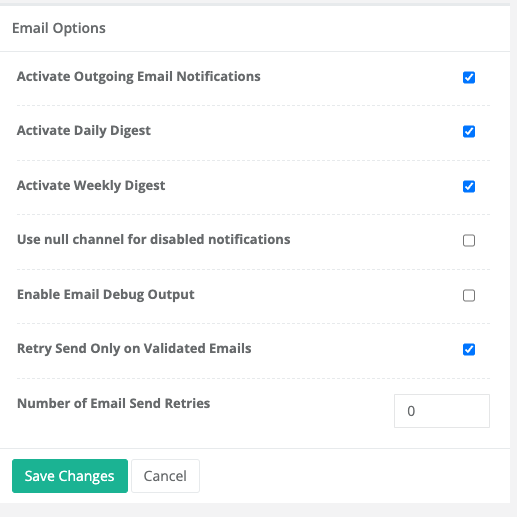
Email Options
Select the checkboxes that apply to your notification settings under "Email Options":
- Activate Outgoing Email Settings: Users will start receiving notifications.
- Activate Daily Digest: The system will send notifications in a daily digest.
- Activate Weekly Digest: The system will send notifications in a weekly digest.
- Show Site Name in Notifications: Enables the site name to display in notifications.
- Enable Email Debug Output: Enables the email debug output.
- Retry Send only on validated emails: Allows the system to retry sending notifications when the mail service account was not responding during the initial notification event. The number of retries may be specified up to 10, and these will occur at 30 min intervals until successful or maximum retries has be reached.
Configure Outgoing Email Notifications
Enter the required email information in the following fields:
- Mail Server Host: Enter the URL of the server hosting your email address.
- From Address: Enter the email address your outgoing emails will be from.
- Bounce Address: Enter the email address your bounced emails will be from.
NOTE:
Your Bounce Address cannot be the same as the From Address.
- Salt for Message ID Header: A randomly generated string used for encryption.
NOTE:
The system randomly generates the Salt for Message ID Header field. If you change this, the system can no longer map all previously sent email notifications to the correct one.
- SMTP Username: Enter the username connected to your email account.
- SMTP Password: Enter the password connected to your email address.
To clear the previously saved password, select the Clear Password checkbox. - Mail Server Port: Enter the mail server port numeric value that is open on your email server.
- Encryption drop-down menu: You can select the following types for your outgoing mail:
a. None
b. SSL
c. TLS - Click the SAVE CHANGES button.
A successful save will result in a green bar at the top of the page with a message that reads "Successfully edited SMTP settings."
Note:
Once the email configuration is complete, it must be enabled by checking the "Activate Outgoing Email Notifications" box at the top of the options on the right nav. Daily and Weekly digests must also be activated if they are to be used. If not activated, even if digest options are selected in site default settings for notification, or notifications in user preferences, they will not be sent. Email debug mode should only be enabled in consultation with support to avoid spamming server logs.
The retry send option may be enabled with a set number of retries up to 10. This applies for notifications to user accounts that have validated email addresses only. The retry option is useful in cases where the email client service may experience intermittent availability / performance issues.

Updated over 1 year ago
